

Bake and Create: Pudding Trifle
Piled high w. fruit and cookies

I’ve been doing a deep dive on pudding this fall. In Baking Blocks, we customized vanilla pudding with essences, extracts, spirits, sweeteners, infusions, yolk, and butter, and in Part 2, we added recipes for chocolate, caramel, and peanut pudding. Last month, for Thanksgiving, we turned that pudding recipe into pudding filled pies – a delicious option for a thanksgiving dessert spread. To finish the series, we’re turning the pudding into another delicious dessert for your holiday party spread: the trifle.
There are many ways to make a trifle, but the core elements are: thickened custard, cake and/or cookies, sauce and/or a fruit/jelly element, and whipped cream. If you think back to the pudding pies recipe, this has nearly the same ingredients, but the composition makes it so texturally different, and–similarly–each combination tastes so amazingly unique.
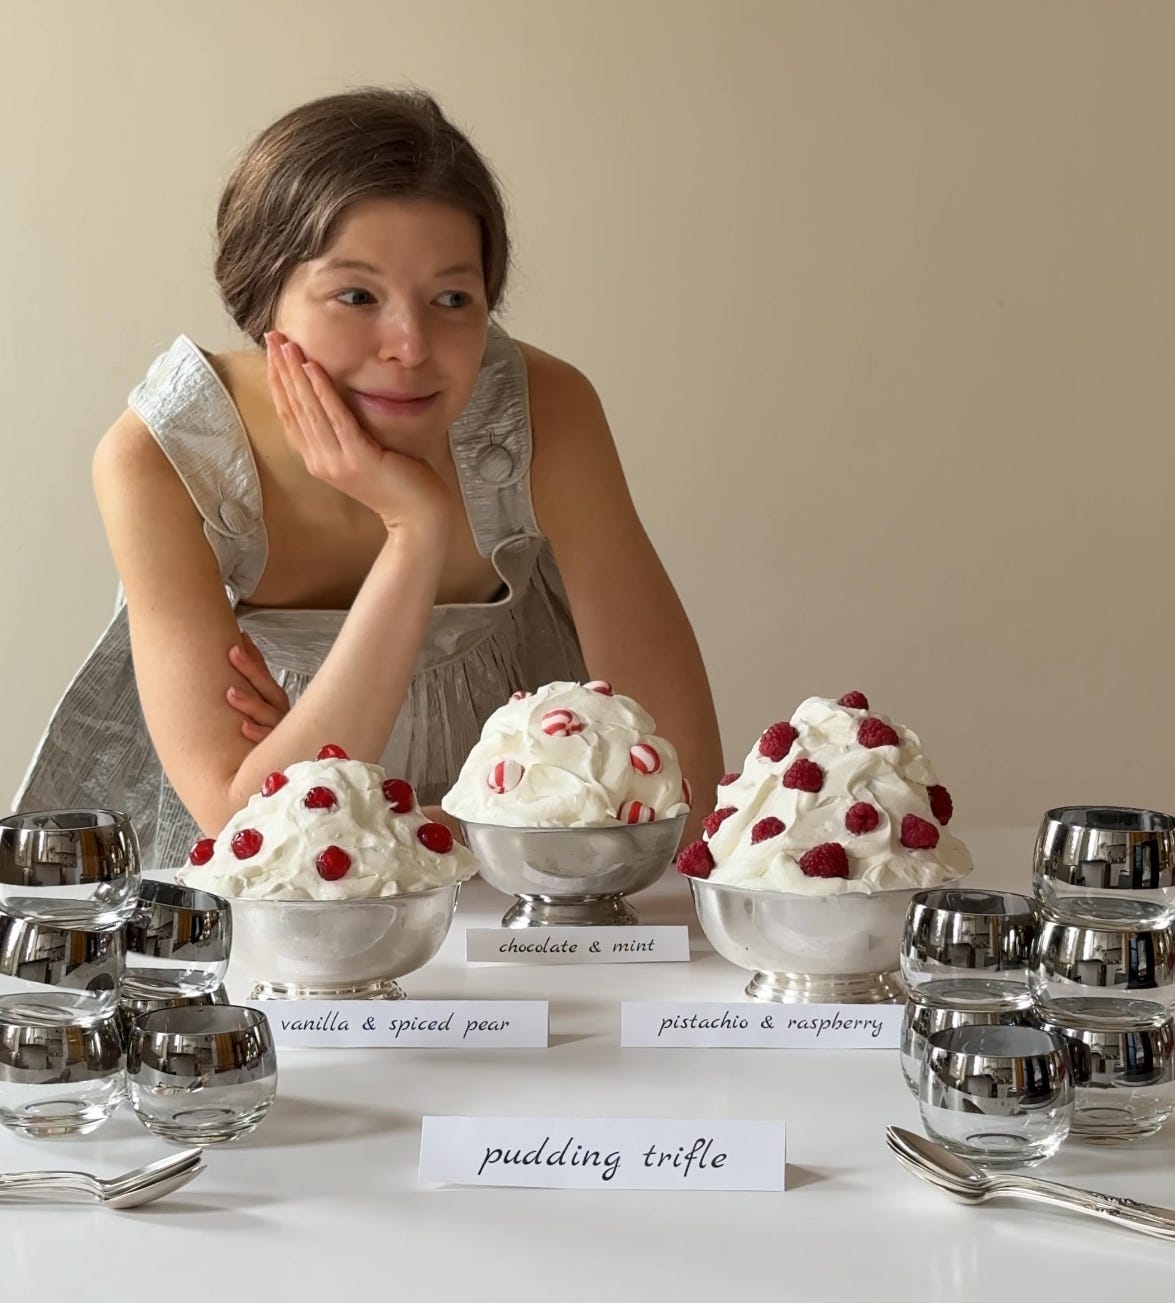
My three trifle flavors were:
Vanilla rum pudding, caramel sauteed pears, gingersnap, and whipped cream
Chocolate pudding, chocolate sandwich cookie, and peppermint whipped cream
Pistachio pudding, raspberry compote, ladyfingers with a little cointreau, and whipped cream (this was my favorite this time, I really loved how the tartness of the raspberries balances the richness
My recipes are for trifles made with store-bought cookies, because 1. it’s delicious, 2. it saves time, and 3. it saves dishes. Ladyfingers make for a really excellent choice, which I learned when developing my strawberry ice box cake. The ladyfingers absorb custard beautifully (like in a tiramisu), becoming like a sponge cake (without the need to bake one). If you do want to bake a cake and use it in a trifle this guide is for you.
If you want a cookie with a tad more flavor than a ladyfinger, I would just be careful about 1. the sweetness of the cookie (you don’t want to make the trifle too sweet), 2. the texture of the cookie (soft won’t work, stay away from a homemade chocolate chip cookie – we want crunchy, airy, store-bought cookies), and 3. the flavor intensity (anything too intense will cover up the other flavors in the trifle). So, if you want to use a flavored cookie like a Biscoff or gingersnap or chocolate sandwich, I would recommend diluting the flavor by going 50:50 with a neutral cookie (ladyfingers, nilla wafers, etc.). I made this mistake early on in testing, going all in on gingersnaps, and it overwhelmed the delicate vanilla, pear, and caramel flavors in the rest of the trifle, but remade it with 50:50 gingersnaps:ladyfingers and was perfect.
As for the fruit, pick whatever goes best with your filling (if fruit doesn’t pair well, eg. chocolate and mint pudding, just skip it!). Depending on the fruit you either need to pick one that is whole or won’t weep once cut, or alternatively you can cook it. You can make a compote, which–depending on the fruit–takes a few minutes and adds a lovely punch of flavor and juicy texture. Or for firmer fruits like apples or pears they can be diced up into bite sized pieces you can sautée or roast - both are delicious with caramel added in for some sauciness.
You can flavor the whipped cream with infusions, essences, extracts, or liquor–like in Baking Blocks Pt. 1. Just be sure to play with these items in moderation, they pack a big punch. Just 1/8 tsp of peppermint extract was perfect for my whipped cream.
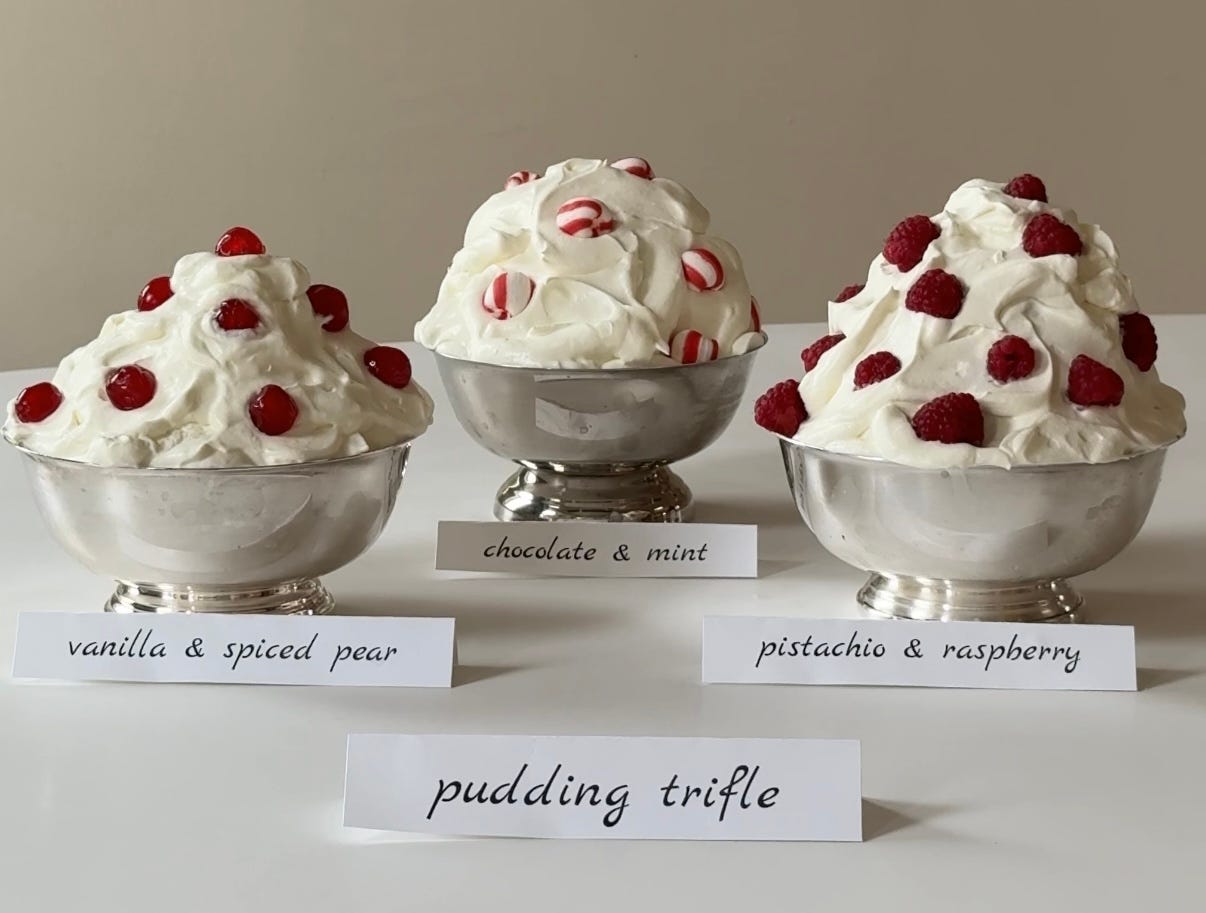
Now the plating. Trifles are normally assembled in big glass dishes with a pedestal. The dishes are beautiful, but I don’t own one, and I can’t really justify the space for one in my apartment. So, I had to get creative. Originally, I had been thinking of layering it in a punch bowl and serving it in punch glasses for a really cute presentation (if I do say so myself). But when I started crunching numbers, I realized that would be a lot of trifle, way more than we could eat (although if you plan on hosting a large party, I can help you with quantities in the comments!).
I found some medium-sized (about 9” across and 4” deep) silverplate serving bowls in the basement. There are a whole bunch online (I saw a handful under $10, and this article is helpful for cleaning them after purchase). This is the perfect size for around 8-10 servings. I layered the pudding, fruit, and cookies up before plating it into a big mound and coating the whole thing with swirls of whipped cream. I then scooped it up into punch glasses. Considering it took around 30-40 minutes of active time (plus a day’s rest), the effort-to-reward ratio is big for this one. My only flag is, if you serve it piled out of the bowl–not nestled inside–you will need to stabilize the pudding more, leading to a thicker texture. It’s a bit too solid for my ideal pudding preference, so I’ve given different quantities of stabilizer for a pudding assembled in a bowl versus in a traditional dish (where it can be a bit looser, and which i preferred in my rounds of testing).
Notes:
The recipe for vanilla pudding trifle is below, and pistachio and chocolate versions are below the paywall
This makes enough for about 8-10 servings
This recipe is designed to be served billowing out of a 9” wide x 4” deep bowl, but if you are making a more traditional trifle layered inside a dish, you can and should add less stabilizer
Please note that this recipe requires overnight set up to get the trifle nice and soft, so it does need to be prepared 1 day in advance
Vanilla Pudding:
For more customizations (i.e. butter, egg yolks, sweeteners, extracts, essences, spirits, or infused milk), see the first post in the pudding series.
1 sheet of gelatin or 2g powdered gelatin (you should skip this if you are layering the pudding in a traditional dish (instead of standing tall in a bowl)
75g white sugar
35g cornstarch reduce by 3-5g if you are layering the pudding in a traditional dish (instead of standing tall in a bowl)
1/2 tsp Diamond Crystal Kosher Salt
150g heavy cream
450g milk
15g vanilla extract
Cookies:
125-150g store-bought, crunchy (maybe airy) cookies, preference for ladyfingers (if using something more flavorful, I highly suggest splitting it 50:50 with ladyfingers)
Fruit/Sauce: Add 250-300g of fruit and/or sauce/compote
Raw Fruit + Caramel Sauce:
200-225g raspberries, blackberries, blueberries, cherries, figs, or bananas (250-300g with skin)
50-100g caramel sauce (use a thick one) optional
Sautéed or Roasted + Caramel Sauce:
225-250g pears or apples (will reduce once cooked)
25g butter
50-100g caramel sauce (use a thick one) optional
Compote:
250g of compote
50g raw fruit of the same flavor optional
Compote Recipe:
1 sheet gelatin or 2g powdered gelatin (this amount of gelatin will not make a jelly, but will stiffen it enough to not be a soggy mess)
300g raspberries, strawberries, blueberries, peaches, plums, sweet cherries (I highly recommend using frozen fruit if it’s out of season; it’s also more affordable and better for the environment)
45g white sugar
5g lemon juice
Whipped Cream:
225g whipping cream
20g sour cream, mascarpone cheese, or cream cheese (for stability)
30g powdered sugar
Dash of vanilla, or other extracts, essences, or liqueurs for flavor (always start with a small amount, 1/8 tsp for extracts and essences, 1tsp for liqueurs) optional
Decor:
Any decorations: fresh fruit, candied cherries, peppermints, etc.
Tools:
8-9” wide x 4-5” deep serving bowl + quart sized deli container for setting the pudding or trifle bowl/other serving dish
Cling film
You can find ingredient information and tips for conversions on my conversion cheat-sheet page. If you have any further questions, please feel free to leave a comment!
Vanilla Pudding!
You can find videos of this recipe here.
Start with your pudding.
If you’re making a trifle that needs to stand in a bowl (not layered in a dish), you need to add gelatin. Start by activating your gelatin sheet in a bowl of cold water, or whisking 2g of powdered gelatin into 8-10g of cold water. Set aside to bloom.
Place a sieve or strainer over a large bowl and set aside.
Place your sugar, cornstarch, and salt in a small pot. Whisk to combine, ensuring all the cornstarch is broken up and mixed in with the sugar. Then shake the pan so that the mixture settles on the bottom of the pot (and not on the edges).
Add your heavy cream and whisk to combine. Once thoroughly mixed, add the milk and vanilla extract (you can also add this at the end, but I recommend doing it now so you don’t forget). Whisk to combine.
Transfer the pot to the stove and place it over medium heat. Whisk the entire time, being sure to scrape up the entire bottom and sides of the pan as you whisk. Once at a full boil, count 15 Mississippis. Then remove from the heat and pour into your sieve to strain and remove any browned bits/clumps (if you are adding any spices, leaves, etc., this is necessary). Pass through the sieve, and into your large bowl. Immediately add in your activated gelatin: for powdered gelatin, just scoop it in; for sheet gelatin, wring out the sheet of gelatin before adding it in. Whisk to combine the gelatin.
Cover the pudding directly with cling film and transfer it to the fridge to set up for 1-2 hours while you prepare the fruit (we don’t need it fully set up, but we don’t want it to be hot while layering).
Fruit!
For the raw fruit:
Wash and dry the fruit (unless you are using bananas). For the raspberries, blackberries, and blueberries, keep them whole. For the cherries, halve and pit them. For the figs, slice or dice (or smoosh) them. For the bananas, peel and slice.
For the sauteed fruit:
Peel and dice your apples or pears into little bite sized pieces, then add to a pan with your butter and cook over medium heat until softened (it may brown in some spots; this is fine). Once done cooking, you can add in some caramel sauce. Remove from heat, and transfer to a bowl. Taste and adjust with any additional seasonings.
For the roasted fruit:
Preheat your oven to 400f. While the oven warms, prepare the fruit, by peeling and dicing into small bites. Once the fruit has been prepared place it on a small baking dish lined with parchment paper and add your butter on top. Transfer to the oven and after a minute give it a stir to distribute the butter. Begin checking for doneness after 20 minutes, but note that it could take about 30 minutes for firmer fruits. Once done cooking, you can add in some caramel sauce. Remove from heat, and transfer to a bowl. Taste and adjust with any additional seasonings.
For the compote:
Start by activating your gelatin sheet in a bowl of cold water, or whisking 2g of powdered gelatin into 8-10g of cold water. Set aside to bloom.
Place your (frozen) fruit into a saucepan along with the sugar and lemon juice. Place over medium heat and cook the fruit down, being sure to give it a bit of a mash every once in a while. Cook until the fruit has thickened and the mixture looks glossy, about 7 minutes. Remove from the heat and pour into a bowl. Add in your prepared gelatin and stir to dissolve. Set aside until ready to use.
Assembly Pt. 1:
These directions are only if you plan to serve your trifle in a bowl like mine. If you aren’t doing that, follow classic trifle assembly!
Take your quart deli container and line the inside with cling film (this helps for much easier release tomorrow). Remove your bowl of pudding from the fridge and break your cookies (into 2-3 pieces each) over the top. Fold the cookies into the pudding. Begin scooping the pudding into your lined deli container, add your prepared fruit filling, and then add more pudding. Layer until the deli container is full, and then pop the lid on. Depending on the size of your cookies, and the volume of fruit, you may not have extra. However, if you do, layer the rest at the bottom of your serving bowl in a flat, even layer (if using an acidic fruit, like raspberries, do not put it at the base of a silverplate bowl as it may tarnish – use a separate glass bowl and add it to the serving bowl tomorrow) and then cover with cling film.
Transfer the trifle container (and optional dish) to the fridge to set up overnight.
Whipped Cream:
Make the whipped cream right before you’re ready for Assembly Pt. 2. Place all the ingredients in a large bowl. If adding extracts, essences, or liqueurs (besides vanilla), add a small amount (1/8 tsp for extracts and essences, 1tsp for liqueurs) before whipping. Whip with a hand mixer until stiff peaks form, taste, and add more flavoring as desired.
Assembly Pt. 2:
Grab your serving bowl and deli container of trifle. Make sure any extra pudding is nice and flat at the bottom of your serving bowl.
Remove the lid from the quart container, lift and pull the sides lightly to make sure it will release easily, and make sure the excess cling film is on the outside of the container (not on the top of the pudding, as it could get stuck underneath). Flip it over into your serving bowl, center it, make sure it’s even and not tilting, remove the quart container, and gently peel off the cling film. If it is tilted, grab a spoon and nudge it into place.
Then plop some big scoops of whipped cream on top of your trifle and use the back of a spoon to swoosh it over the trifle, gently spreading the whipped cream all over. Add more on top and push it into place with the back of your spoon. Be sure to swoosh the spoon gently so as not to mix your trifle and whipped cream. This recipe makes a little extra whipped cream, in case you want/need to use a little more.
Once the whipped cream is spread onto your trifle, admire your work, and then decorate as desired. I find that I often add too much decoration – a few primely placed (well spread) decorative elements are delightful. I would suggest adding these elements right before serving, as the pudding will settle over time, and decorations may shift a bit.
You can store this in the fridge until ready to eat (be aware that the longer it sits, the more it may settle or slump – I didn’t hold mine for longer than an hour, so I can’t really say how long it will last; it depends on how thick your fillings are, how cold your fridge is, etc.). Serve with a big spoon, lots of cups, and personal spoons, so guests can serve themselves and dig in.
