

Bake and Create: Pudding Pie
Crumb crust + pudding + fruits/nuts + whipped cream = endless customizations

Another new series! Welcome to Bake and Create! Now that you know how to customize and make your own pudding recipes (see Baking Blocks on vanilla pudding, and chocolate, caramel, and peanut pudding), it’s time to make things with it!
This first installment (of two) is all about pudding pies that follow a pretty easy formula: pudding + fruits/nuts (optional) + crumb crust + whipped cream = pudding pie.
For my pudding pies, I like to use a cookie crumb crust (although you can make and bake a standard pie crust) because it adds on a whole other layer of flavor + texture + is easy. There are 8+ different crumb crust formulas below for you to pick from for your pudding pies.
For similar reasons I love to add in fruit (roasted or raw) or nut purees (pralinés or butters). These too just add on another texture and flavor layer to the pies. I wanted to calculate the total number of combos available between all the options, but as soon as you add in the possibilities of subbing sugars, adding spirits, browning butter, etc., the combinations become seemingly endless.
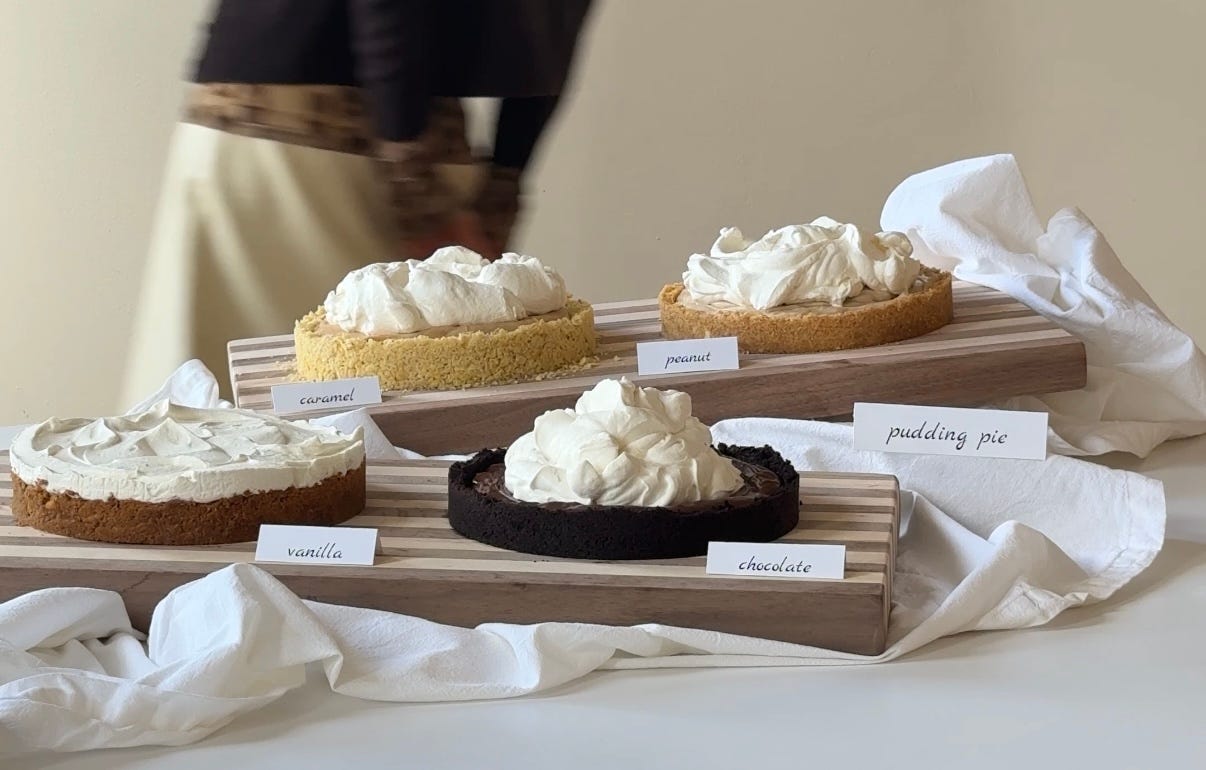
With endless flavor combinations come really varied results. I made 4 pies:
1) Vanilla pudding with armagnac, roasted pears, and a gingersnap crust
2) Caramel and brown butter pudding with praliné, and a saltine cracker crust
3) Chocolate pudding, and a chocolate sandwich cookie crust
4) Peanut butter pudding with bananas, and a Nilla Wafer crust
I have to say, I was absolutely shocked at how unbelievably different and great all of these pies tasted despite them all following the same formula. I was sure my favorite would be the chocolate or peanut-banana (I am obsessed with Brooklyn blackout cake and banana pudding), but it was actually the vanilla with roasted pears that stole my heart (that being said, the other flavors were all tied for second).
I think it would be so fun to make multiple pies for a holiday gathering, creating a little pudding pie bar with a range of flavors to suit everyone’s tastes (the crumb crust and quick-to-make pudding make this far easier than doing an array of, say, apple, pumpkin, and pecan pie). This is such a fun recipe to get creative with–you never know which combination might be your favorite, it might surprise you!
Vanilla pudding:
Chocolate, caramel, and peanut pudding recipes are below the paywall at the bottom of the page.
For more customizations (ie. butter, egg yolks, sweeteners, extracts, essences and spirits, and infused milk), see the first post in the pudding Baking Blocks series.
75g white sugar
35g cornstarch
½ tsp Diamond Crystal Kosher Salt
150g heavy cream
450g whole milk
15g vanilla extract
Crumb crust:
I’ve created the following formulas for different cookies/crackers: X crumb = X amount of butter + X amount of sugar.
250g chocolate sandwich cookie = 50g butter
240g Biscoff cookies = 65g butter
225g shortbread/butter cookies/Nilla Wafers = 75g butter
225g gingersnaps/graham crackers = 100g butter
190g Ritz Crackers = 100g butter + 25g sugar
190g Saltine Crackers = 125g butter + 25g sugar (this version is very crumbly, be forewarned!)
Optional additional fillings:
Fruit - raw:
150-180g bananas (weighs 225-275g with the skin on), raspberries, blackberries, blueberries, cherries, or figs
Fruit - roasted:
250g-300g plums, apricots, nectarines, pears, raspberries, cherries, blackberries, or concord grapes
15-40g sugar (depending on how sweet vs. tart your fruit is, and how sweet you want the filling)
A tiny squeeze of lemon juice or a drop of vinegar of choice
Zest of a citrus fruit, vanilla bean scrapings, a spice etc. optional
Nuts:
75-100g nut butter (almond, pecan, hazelnut, peanut) or praliné
Whipped cream:
50g mascarpone or 30g cream cheese (optional but highly recommended for slicing and tempering the sweetness of the whole dessert–I promise you will not taste the cheese or note any tangy flavors) cold
30g powdered sugar
5g vanilla extract
300g heavy whipping cream cold
Tools:
8-9” spring form pan or 9” pie pan
Food processor or rolling pin for breaking up cookies/crackers
You can find ingredient information and tips for conversions on my conversion cheat-sheet page. If you have any further questions, please feel free to leave a comment!
Vanilla pudding!
Start with your pudding.
Place a sieve or strainer over a measuring cup or bowl and set aside.
Place your sugar, cornstarch, and salt in a small pot. Whisk to combine, ensuring all the cornstarch is broken up and mixed in with the sugar. Then shake the pan so that the mixture settles on the bottom of the pot (and not on the edges).
Then add your heavy cream and whisk to combine. Once thoroughly mixed, add the your milk and vanilla extract (you can also add this at the end for stronger flavor, but I always add now so I don’t forget). Whisk to combine.
Transfer the pot to the stove and place it over medium heat. Whisk the entire time, being sure to scrape up the entire bottom and sides of the pan as you whisk. Once at a full boil, count 20 Mississippis. Then remove from the heat and pour into your sieve to strain and remove any browned bits/clumps (if you are adding any spices, leaves, etc., this is necessary). Pass through the sieve, and into your bowl.
Cover the pudding directly with cling film and transfer it to the fridge to set up for 3 hours while you prepare any nut/fruit filling and the crumb crust.
Nuts and fruit!
For the nuts:
Unless you’re making your own nut butter or praliné, there is nothing to do here before assembly. Move on to the crust!
For the raw fruit:
Nothing to do here until just before assembly. However, I’ll outline it for ease (just be sure to return):
Wash and dry the fruit (unless you are using bananas). For the raspberries, blackberries, and blueberries, keep them whole. For the cherries, halve and pit them. For the figs, slice or dice (or smoosh) them. For the bananas, peel and slice.
For the roasted fruit:
Preheat your oven to 400f. While the oven warms, prepare the fruit:
Wash all of the fruit.
Stone fruits: slice your plums, apricots, or nectarines. You can cut them in half, pit them, and then slice them even smaller, depending on the size.
Cherries: pit and cut in half.
Pears: peel and dice.
Raspberries or blackberries: keep whole.
Concord grapes: …you’ll roast them whole, but you may want to skin and seed them when they come out of the oven (I’m sorry, this is a messy process).
Once the fruit has been prepared, mix with sugar and lemon juice/vinegar. Transfer to a baking dish lined with parchment paper and roast until your desired texture is reached. Begin checking for doneness after 15 minutes, but note that it could take about 30 minutes for firmer fruits. Once done cooking, let cool fully before using.
Crumb crust!
Preheat your oven to 350f.
Melt your butter in the microwave or on the stove. Place it in a medium-large bowl.
Add your cookies/crackers to a food processor and blend until crushed up (if you don’t have a blender, put them into a sealable bag and crush with a rolling pin). Transfer the blended cookie dust to the bowl with butter. If you’re using crackers, add your sugar.
Mix to combine. You want all of the butter to be evenly distributed. If you are using Saltines, really press the butter into the crackers. Pour the crumb crust into the pie pan or springform.
I like to use a water glass or measuring cup to press in the sides of the crust before pressing in the bottom (the bottom is way easier to do so save that for last). To press the sides: I like to press the top of the crust down with my thumb (of my non dominant hand) while using the glass in my other hand to push in from the side (see the video above) - pressing both the top + sides together at the same time really helps compact it. The firmer you press, the sturdier the crust will be. Normally, you need to worry about the crust being too firm, but that’s not a problem here, as the pudding will soften it.
Once the sides and bottom feel even and thoroughly pressed, transfer to the oven and bake for 10-12 minutes until fragrant. If you are using Saltines, place the crust in the fridge for 10 minutes to set up before baking.
Allow the crust to fully cool before adding your pudding.
Assembly!
After the pudding has set up and the crust has cooled, you can move on to the assembly.
Whisk the pudding to loosen it. If you are using raw fruit (or not too juicy roasted fruits), gently fold it into the pudding. Pour the pudding into the prepared pie crust. If using a nut butter, praliné or roasted fruit, pour/spread/swoosh it on top (or if the roasted fruit isn’t so juicy you can also place them on the bottom of the crust). Cover the pie plate/springform pan with cling film (or simply straddle a plate on top if using a springform pan to serve as a lid). Transfer back to the fridge for at least 4-6 hours, or overnight (this is especially nice for a softer crust and infused fruit flavor, like with banana pudding). An overnight rest will also give you cleaner slices.
Once the pudding is ready to serve, prepare your whipped cream (recipe below), and cover your pie with it. The recipe makes enough to fully coat the pie. I like to mound it all in the middle and do swooshes (see the video tutorials for all kinds of swooshing below), but do whatever suits you best.
Whipped cream!
Place your mascarpone or cream cheese, powdered sugar, and vanilla extract in a large bowl or the bowl of your stand mixer. Beat until combined and smooth. Then add in your cold heavy cream and whip until stiff peaks form (not too stiff that it begins to separate, just enough to hold their peaks).
Then top your pie. The video above shows the different ways I added the whipped cream. For all of them, I like to fold the whipped cream first before plopping a dollop on top, as it adds extra texture and layers, like clouds.
Firstly, I plopped the whipped cream in different directions about 2” away from the crust, and slowly built up to the center. You could also do these swooshes with the back of a spoon. For the next one, I made a ring of plops closer to the center (but you could also do this close to the rim). Lastly (you can only do this one with springform), I loaded it all up into the mold, smoothed it to level, bringing it all the way to the edges, and then swooshed the top for some texture.
