

Cone Castle Ice Cream Cake
With toasted Italian meringue

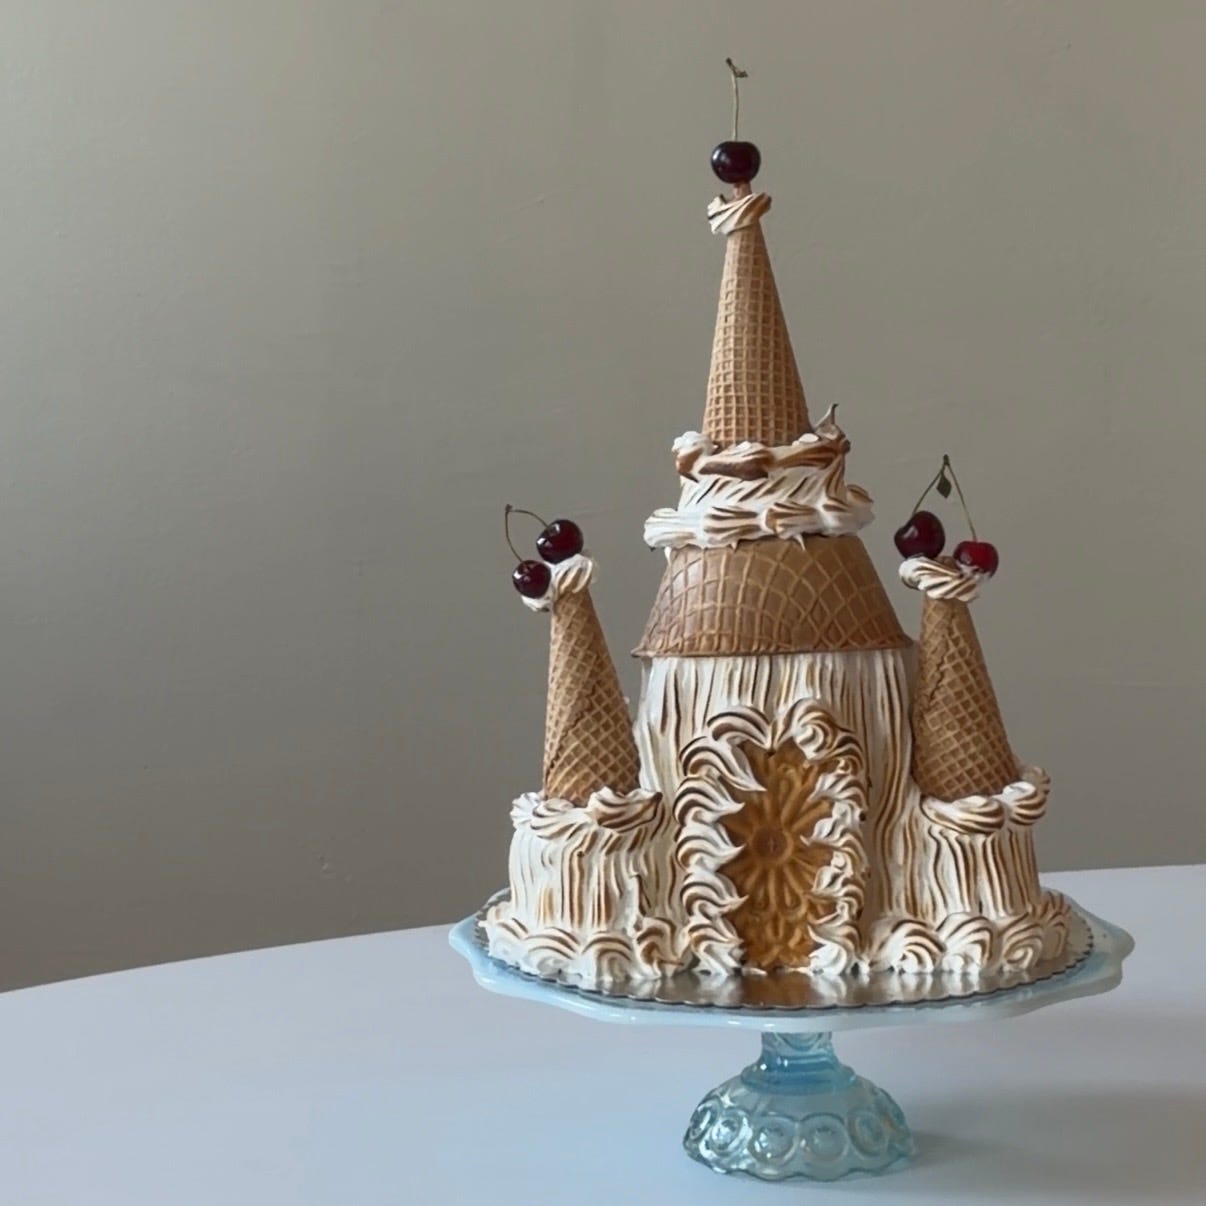
Making a cone castle cake has been on my bucket list since I was six years old, and I’ve finally got around to making one as an ice cream cake - my logic being, if the cake is going to be decorated with cones, the inside of the cake may as well be ice cream. Turns out, that logic works.
More ice cream cake recipes:


There is no need to turn on the oven for this recipe, and it takes very little of your time. In fact, two of the three components are store-bought, allowing you to spend more time summering. To purchase: cones (3 kinds) and ice cream (4 pints of your choosing). To make: toasted Italian meringue. Yum. All this cake requires is a bit of assembly prep (~5 minutes), making an Italian meringue (15 minutes), and decorating (20 minutes). The only thing standing between you and the Cone Castle Ice Cream Cake is ~45 minutes of active work time (but a warning, there is a whole bunch of chilling time, in fact this recipe is best made over two days!).

As the main component of this cake is ice cream, I suggest getting some pints of your favorite flavors. I used a mix of sorbet and ice cream, and I loved it. I selected vanilla bean, pistachio, and strawberry ice creams, as well as a mango sorbet. I would suggest using Häagen-Dazs, as it’s dense and firm, meaning it won’t melt while you decorate.
Every bite felt like a totally different flavor combo, and I was unable to put down my spoon. While I would absolutely repeat this same combo, caramel + chocolate + nut flavors would be decadently sublime. I could come up with flavor combos all day, but let’s get into the recipe.
Cone Castle Ice Cream Cake:
4 pints of firm/dense* ice cream/sorbet (vanilla bean, pistachio, strawberry ice creams; and mango sorbet from Häagen-Dazs were my picks)
1 batch of Italian meringue see below (can be subbed with whipped cream, but I’m not sure how much you will need to make!)
2 pizzelle cookies
3 cake cones
3 sugar/waffle cones
1 cone bowl
3 cherries or maraschino cherries for decoration
Italian Meringue
225g caster sugar
70g water
120g egg whites (from 4 large eggs)
3g white vinegar
1/2 tsp Diamond Crystal kosher salt
3-5g vanilla extract good quality
Tools:
Lots of time
Quart deli container
Cling film (to prevent freezer smells)
Space in your freezer: enough for the bottom half of the cake: 6” tall and 9” around + 6” tall and 4” around
A cake board this is really nice for holding the cake, but you could also use a plate
Candy thermometer not needed if making whipped cream
Hand mixer or stand mixer
Piping bag + tip of choice (I used Ateco 842)
Blow torch not needed if making whipped cream
*Firm/dense ice cream will mean that the ice cream is less likely to melt while you decorate, Häagen-Dazs is my go to for this
You can find ingredient information and tips for conversions on my conversion cheat-sheet page. If you have any further questions, please feel free to leave a comment!
Prep!
The evening before you plan to serve this cake, you need to prep.
Start by clearing out your freezer space, see the tools section above.
Take your 4 pints of ice cream out of the freezer and let them warm up for 5 minutes. Grab your 3 cake cones. Take 1 of the cake cones and cut the top off from the base. Then trim the base so it's not too tall (you can get rid of the bit you trim off). Place both of these cone-pieces on a little plate (or spare deli container lid). Grab your ice cream scooper or bread knife, scissors (read below), and your quart deli container. Then remove the lids and plastic liner from the ice cream.
Now decide whether you want your ice cream to be layered in slices (pretty but a bit more difficult and messy), or scooped and swirled (easier and also pretty).
Slices: Starting at the top lip, snip down into the ice cream pint packaging, then repeat on the opposite side. Lay the ice cream pint on its side and lift the top half up, revealing the ice cream (make sure to keep it nestled into the container so it doesn’t touch the table, see the video above). Repeat with all your ice cream pints. Then use your bread knife to horizontally cut 4-5 slices into your pint. Layer up the slices in your quart container (as many as will fit), and be sure to press down after each addition. Once the quart container is filled, snap on the lid and transfer to the freezer.
Scooped/swirled: Scoop big scoops of ice cream (1/3-1/2 cup) into the quart container, pressing down after each addition to ensure the ice cream is compact, and there are no gaps (it helps to constantly turn the quart container to keep an eye out for gaps). Once the quart container is full, snap on the lid and transfer to the freezer.
You’ll have some ice cream left, which goes into the 3 cake cones. First, fill the 2 that haven’t been sliced, layering in the different remaining flavors and pressing down as you scoop. Scoop until the ice cream is flush with the top, wrap it in cling film, and transfer it to the freezer.
With your remaining ice cream, fill up the 2 cut cone pieces just to the top, and rest them on the small plate/deli container lid so that the ice cream doesn’t fall out the bottom. Cover this with cling film and transfer to the freezer.
Hold in the freezer for at least 8 hours, preferably overnight.
Prep Continued!
The following day (at least 2 ½ hours before you want to serve), grab the ice cream in the quart container and the 2 whole ice cream cones. Also grab 1 pizzelle cookie and a cake board or plate for the ice cream cake, and place one of your two pizzelle cookies in the center of it.
Run some warm tap water over the sealed deli container filled with ice cream for about 30 seconds (or place a warm kitchen towel around the outside). Then remove the lid and flip the ice cream onto the pizzelle cookie. Squeeze the quart container (from the bottom and sides) to push the ice cream out.
Once the ice cream is out of the container and centered on the pizzelle cookie, take your 2 ice cream-filled cake cones, flip them upside down, and place them on either side of the quart of ice cream; these are your turrets (you want to place them slightly closer to the front – rather than being exactly parallel on opposite ends). Then nestle them into the ice cream slightly. Transfer back to the freezer for at least 1 hour before proceeding with the meringue.
Right before you’re ready to make the meringue, you need to do a few things:
Grab your 3 sugar/waffle cones and your cone bowl
Fit your piping bag with your medium star piping tip of choice
Cut the sides off of your other pizzelle cookie (you want it about 2” wide)
Italian Meringue!
Place the caster sugar and water in a small pot and set it over medium heat with a candy thermometer inside. We’re waiting for the syrup to reach 240f.
While the sugar syrup heats up, place your egg whites and white vinegar in a large bowl or the bowl of your stand mixer. Begin whipping with your hand mixer or whisk attachment, starting at a low speed and increasing it by one level every 15-30 seconds. Whip until you have soft peaks. Once you’ve reached soft peaks, turn the mixer off until the sugar reaches 240f.
Once the sugar reaches 240f, turn off the heat. Turn the mixer back on high speed and drizzle in a very thin and consistent stream of molten sugar into the egg whites. Be careful, it’s very hot – don’t get any on your hands. Some find it helpful to stream down the side of the bowl (I personally don’t). Whip until the meringue has fully lightened and completely cooled. The mixture should begin to feel thick and stiff.
Add in the salt and vanilla extract and whip again for a few seconds.
Transfer the meringue to your piping bag, and move onto decoration!
Decoration!
I would highly suggest watching the video here in addition to reading the directions as the recipe says the word “cone” a lot
Grab the main part of the cake from the freezer and begin piping strands of meringue, going from the bottom of the cake to the top. I like to work from the cake cone to the center (it helps if you end up going a bit diagonal with your lines, you’ll catch yourself before it starts looking too wonky). Work your way around the front and back of the cake. Then cover the cake cones as well. If you notice any naked bits, just make another strand from bottom to top (no one will notice). You want to work swiftly here. My lines were pretty wonky, but it really doesn’t show all that much in the end.
Place your pizzelle cookie in the center front to make a ‘door’ and press to secure it. Then pipe a shell border (or any border of your liking) around the door. Pipe a shell border around the base of the cake (this both cleans up the bottom–which may look messy–and prevents ice cream from leaking out). I like to keep the bottom shell border from covering the door.
Then take 2 of your sugar/waffle cones and nestle them on top of the cake cone turrets. You can pipe a border along the base of the cake cones (or not). And then also do a little piping decoration on the point tip of the waffle cones (this adds a nice little flourish that helps highlight the cherries we will put on later).
Grab the smaller base of the final cake cone in the freezer and place it in the center on the top of the cake like a little hat (this will serve as a prop to add some extra height to your ‘roof’ (waffle/sugar cone bowl). Admire your work and then transfer to the freezer to set up for 1 hour.
While the main cake sets up, grab that final wider cake cone piece from the freezer. Also grab the waffle/sugar cone bowl. Turn the bowl upside down, and place the cake cone piece on top. Decorate the cake cone with some strands of meringue to cover it, and then pipe a shell border around the base (to cover up a messy bottom). Then flip the final (pointy) waffle/sugar cone on top of the meringue coated cake cone. You can pipe a border along the base of the cake cone (or not). And then also add piping decoration on the point tip of the waffle cone to match the other two turrets. Transfer this component to the freezer as well (we keep these separate so the cake is short enough to fit in the freezer).
Serve!
Right before you plan to serve the cake, take the 2 components out of the freezer. Stack the ‘roof’ onto the center ‘hat’ to stack the entire cake. Nestle it in a bit to secure it.
Gently skewer your 3 cherries onto the tippy tops of the pointed cake cones. I find it easiest to hold the cake cone as I push down (so I don’t press too hard).
Take a step back, and–again–admire your work.
If you decorated the cake with whipped cream, you’re all done! If you used meringue, grab your blow torch, turn it on a low setting, and then carefully and lightly torch just the meringue (pick up the piped raised edges, not the entirety of the meringue).
Then present and dig in!
Transfer any leftovers back to your deli container and freeze.
Even more ice cream cake recipes:


