

Coffee + Cookie: Berry Baskets
Stuffed with jam and cream

While this new series is called Coffee + Cookie, it may as well be called, ‘What else can I do with this mold I own?’ 1. I’m not quite sure if this recipe–or the last one–is more of a cookie or a cake, and 2. both recipes utilize molds for other desserts.

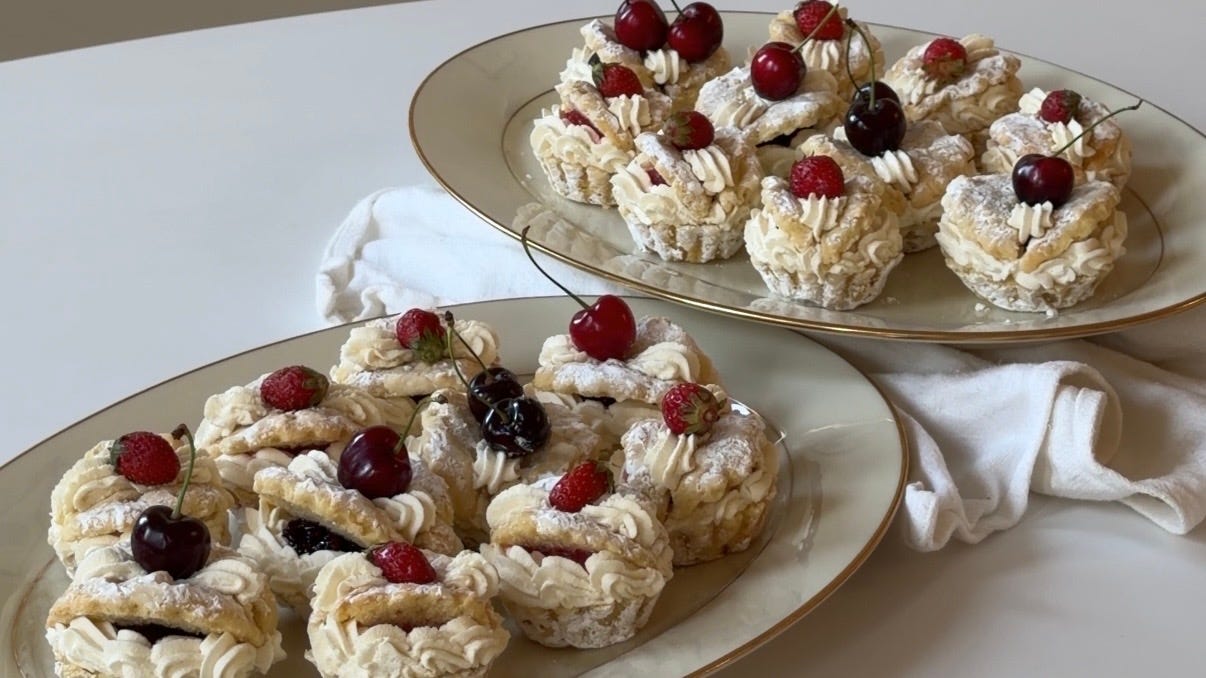
This month’s recipe turns a Lofthouse cookie into a ‘berry stuffed basket.’ Similar to last month’s recipe, where ladyfingers are baked in a madeleine pan (and then stuffed with a pearl of mascarpone cream and dipped into coffee to turn it into hand-held tiramisu), this recipe bakes Lofthouse cookies in mini tartlet tins. They get their lofty tops sliced off and cut in half on an angle, and the bottom half of the cookie gets topped with cream and jam. When the top is placed back on, you get an open, overflowing, double-lidded ‘basket’.
This cookie formula is very similar to a classic Lofthouse recipe, just with yogurt in lieu of sour cream. It is also, of course, baked entirely differently. The Lofthouse crumb is airy and cake-y yet sturdy, making it great for slicing and delicious when stuffed with jam and cream (reminiscent of shortcake). Pair this with an iced espresso for a bit of a bitter note, and you have the perfect pick-me-up.
These cookies can be baked in advance and frozen. You can also store the cookies covered in the fridge. For best aesthetic practices, bring them to room temperature and then pipe and fill your cookies right before serving (you can fully assemble them and then store them in the fridge, but the jam may stain the whipped cream).
Makes 11-12 cookies
Lofthouse-ish Cookies:
1/2 tsp Diamond Crystal Kosher Salt
100g butter + more for lining the tartlet tins room temperature
100g powdered sugar
75g yogurt ideally room temperature (Greek or plain both work, but will lead to different results. Greek yogurt = tighter crumb that makes the cakes easier to slice, while plain yogurt = a slightly fluffier crumb that is slightly harder to slice.)
1 large egg room temperature
8g (or 2 tsp) vanilla extract
175g all-purpose flour
10g cornstarch
1/2 tsp baking powder
1/4 tsp baking soda
Whipped Cream:
250g heavy cream cold
25g powdered sugar
5g vanilla extract
Finishing:
125-150g jam of choice
12 pretty pieces of fruit to match the jam optional
Powdered sugar optional
Tools:
11-12 miniature tartlet tins preferably nonstick
I made 2 versions, the 1st used tall, but narrow, tart tins makes a full 12 cookies, while the 2nd used wider, but shorter, tart tins making 11 cookies. With whatever tins you use, make sure the volume is 55-65ml.
3-tablespoon ice cream scoop optional but helpful
Small piping tip (I used Ateco 842)
Piping bag
Hand mixer or stand mixer
Bread knife sharp!
You can find ingredient information and tips for conversions on my conversion cheat-sheet page. If you have any further questions, please feel free to leave a comment!
Cookies!
Begin by thoroughly buttering your tartlet tins. We do not want these cookies to stick (none of mine did, but my tins were also nonstick). Place the buttered tins on a parchment-lined baking sheet.
Add the salt and room temperature butter to a large bowl or the bowl of your stand mixer fitted with a paddle. Beat for 1-2 minutes to soften fully, add in the powdered sugar (sifting it in is even better, but this isn’t mandatory), and whip to lighten and dissolve the sugar. Add the yogurt, egg, and vanilla, and beat until combined. If the egg or yogurt is cold, the mixture may look curdled, but that’s fine for this bake.
Straddle a sifter over the bowl and weigh in your flour, cornstarch, baking powder, and baking soda. Give the ingredients a good stir in the sifter to ensure they are evenly distributed. Then sift the dry ingredients into the batter and fold them thoroughly to combine (no mixer here; we don’t want it to be too tough). The dough should be soft, almost like a cake batter. You will notice in the video above that the texture looks a little different; that’s because it was an earlier version of the recipe. Your batter will be looser and fluffier. Additionally, the molds in the video are less full. Your batter will pretty much fill the tins.
Grab your prepared molds and use your 3-tablespoon ice cream scoop to add the batter into each tartlet mold (if you don’t have a scoop of that size, use a spoon to weigh out ~45g per mold for the smaller molds, and ~50g for the larger molds). Once all the batter has been scooped (evenly disperse any leftover batter), use your fingers to smoosh the batter down flat.
Transfer the cookies to the fridge for 30-60 minutes to set up. While they set, preheat the oven to 350f with a rack set in the lower 1/3rd of your oven.
Once the cookies are done setting, transfer them to the oven and set a timer for 17 minutes. Once done, the edges will be lightly browned, the top puffed like a muffin, and they will gently spring back when poked with your finger. Remove from the oven and set aside to fully cool for ~1 hour.
Cooled cookies can be wrapped in cling film and frozen (if you want to prepare in advance); just be sure to bring them to room temperature before assembling and serving. To release them from their tins, I rewarm the bottom slightly (place them on a preheating oven).
Keeping the cookies in their tins, and using the tin as a guide, slice the tops off with a bread knife. Cut them flush with the top of the tartlet tins to get a smooth, even layer.
Then take the top bit and slice it in half (if you used plain yogurt, and you’re having difficulty slicing without the cookie crumbling, make sure you are using your sharpest knife; if that doesn’t work, place the cookies in the freezer for 30-60 minutes to firm up). Trim the inside of each half at a 45-degree angle to help to ‘prop’ the baskets open (leftover slices are a chef’s treat, enjoy). These directions may be confusing, please refer to the video above.
Flip each tin over and give it a hard tap. The cookie should slip out. If not, warm the outside of the tin up (with a warm oven or blow torch). If this doesn’t work, the tin probably wasn’t buttered enough, and try using a small knife/toothpick to get it out :(. Place the 2 top halves with the bottom half and set those aside while you repeat these steps with the rest of your cookies.
Assembly Prep!
Optional: You can place some powdered sugar in a bowl and give each top half and bottom of the cookie a spin in the bowl to coat the outside in powdered sugar (do this one at a time).
Grab your jam and a small spoon, and wash and dry your fruit.
Only move on to the next step when you are ready to pipe and serve the cookies!
Whipped Cream!
Prepare your piping bag by fitting in the tip and setting aside. (P.S. you will need to pipe quickly here, as the cream is not stabilized, though you could make a stabilized whipped cream if you don’t want to rush.)
Place all the ingredients for the whipped cream in a medium-sized bowl and whip with a hand mixer until you have stiff peaks. Fit the whipped cream into your piping bag and get ready to pipe!
Decoration!
Take a cookie and remove the top halves. Pipe a border of whipped cream (in any style that suits you – I did a classic shell border); this border will act as your ‘well’ to hold your jam. Fill the whipped cream border with your jam, and then take your 2 top basket halves - angled cut sides touching - and smoosh them into the middle of the cookie and the jam and whipped cream. Make sure they are touching in the center and are propping open.
Repeat with your remaining cookies, working quickly (to avoid the whipped cream getting too hot). Once done with all the cookies, you can pipe a little shell at the top seam of the ‘basket’ and add on a piece of fruit in the middle, or leave it plain.
Plate up and serve along with an iced espresso and some milk or cream. I love the way the bitter espresso and short drink format plays with the cake-y, creamy, and (a little) punchy cookie. Any leftover cookies can be stored in a container in the fridge, just bring them to room temperature before enjoying again!
More recipes:

